Difference between pages "File:Step22.jpg" and "WHMCS Billing Module for XtreamUI"
| Line 1: | Line 1: | ||
| + | == Overview == | ||
| + | This module allows Users to be auto-provisioned instantly on payment for XtreamUI. Automates the adding of credits for Reseller's and Users. | ||
| + | |||
| + | == Requirements == | ||
| + | Requirements are the same as WHMCS. | ||
| + | |||
| + | Requirement Minimum Recommended PHP Version 7.2 Latest 7.3 or 7.4 Release PHP Memory Limit 64MB 128MB** | ||
| + | |||
| + | == Installation and Configuration == | ||
| + | |||
| + | === Downloading and Uploading === | ||
| + | |||
| + | In this tutorial we will show you how to successfully install ProjectX For XtreamUI. | ||
| + | We will guide you step by step through the whole installation and configuration process. | ||
| + | |||
| + | 1. Log in to our client area and download the module. | ||
| + | |||
| + | [[File:step1.jpg|600px]] | ||
| + | |||
| + | 2. In the downloaded file you might find one or two packages that support different PHP versions. | ||
| + | In the most recent versions of the module, you will find only one package that supports PHP 7.2 and later. | ||
| + | |||
| + | [[File:PHP71_74.png]] | ||
| + | |||
| + | |||
| + | 3. Extract the package and upload its contents | ||
| + | '''addonxuiresell''' will be uploaded to whmcs/modules/addons | ||
| + | '''xuiresell''' will be uploaded to whmcs/modules/servers | ||
| + | |||
| + | The content of the package to upload should look like this. | ||
| + | |||
| + | [[File:xtreamui2.png|800px]] | ||
| + | |||
| + | [[File:xtreamui3.png|800px]] | ||
| + | |||
| + | === How to License === | ||
| + | |||
| + | 4. Log in to our client area and get your license key. | ||
| + | |||
| + | [[File:Xtreamui4.png|600px]] | ||
| + | |||
| + | 5. In Whmcs go to "System Settings" > "Addon Modules". | ||
| + | |||
| + | [[File:Xtreamui6.png]] | ||
| + | |||
| + | 6. Click Activate. | ||
| + | |||
| + | 7. Click Configure. | ||
| + | |||
| + | 8. Paste your License Key in, Check the box "Full Administrator" and click Save. | ||
| + | |||
| + | [[File:Xtreamui5.png|800px]] | ||
| + | |||
| + | === How to Configure === | ||
| + | |||
| + | 9. In order to create and configure a product, go to 'System Settings' → 'Products/Services'. | ||
| + | |||
| + | 10. Click "Create New Group" and click save. | ||
| + | |||
| + | 11. Click "Create a New Product". | ||
| + | |||
| + | [[File:Xtreamui7.jpg|800px]] | ||
| + | |||
| + | 12. Fill in the above information. Make sure you select "XUIResell" as the module. Click Continue. | ||
| + | |||
| + | [[File:step8.jpg|800px]] | ||
| + | |||
| + | 13. Fill in product Description. You can leave Welcome email as the default. We will setup a Email template later and you can come back and change the Welcome Email. Click continue. | ||
| + | |||
| + | [[File:step9.jpg|800px]] | ||
Revision as of 11:17, 28 March 2021
Overview
This module allows Users to be auto-provisioned instantly on payment for XtreamUI. Automates the adding of credits for Reseller's and Users.
Requirements
Requirements are the same as WHMCS.
Requirement Minimum Recommended PHP Version 7.2 Latest 7.3 or 7.4 Release PHP Memory Limit 64MB 128MB**
Installation and Configuration
Downloading and Uploading
In this tutorial we will show you how to successfully install ProjectX For XtreamUI. We will guide you step by step through the whole installation and configuration process.
1. Log in to our client area and download the module.

2. In the downloaded file you might find one or two packages that support different PHP versions. In the most recent versions of the module, you will find only one package that supports PHP 7.2 and later.
![]()
3. Extract the package and upload its contents
addonxuiresell will be uploaded to whmcs/modules/addons
xuiresell will be uploaded to whmcs/modules/servers
The content of the package to upload should look like this.


How to License
4. Log in to our client area and get your license key.

5. In Whmcs go to "System Settings" > "Addon Modules".

6. Click Activate.
7. Click Configure.
8. Paste your License Key in, Check the box "Full Administrator" and click Save.

How to Configure
9. In order to create and configure a product, go to 'System Settings' → 'Products/Services'.
10. Click "Create New Group" and click save.
11. Click "Create a New Product".
12. Fill in the above information. Make sure you select "XUIResell" as the module. Click Continue.

13. Fill in product Description. You can leave Welcome email as the default. We will setup a Email template later and you can come back and change the Welcome Email. Click continue.

File history
Click on a date/time to view the file as it appeared at that time.
| Date/Time | Thumbnail | Dimensions | User | Comment | |
|---|---|---|---|---|---|
| current | 10:58, 23 March 2021 | 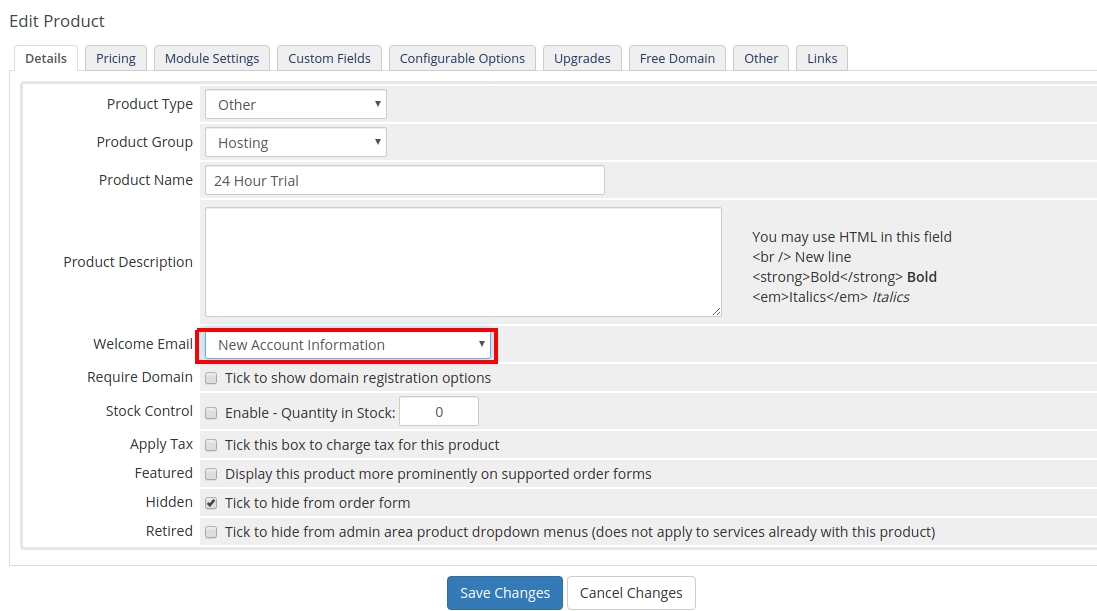 | 1,097 × 611 (205 KB) | Admin (talk | contribs) |
You cannot overwrite this file.
File usage
The following 3 pages link to this file: